This was a web challenge with source code to the application, which I find really fun. It required some cool reversing of the code to understand what it was exactly doing. In the end, a very satisfying challenge to solve.
The Challenge
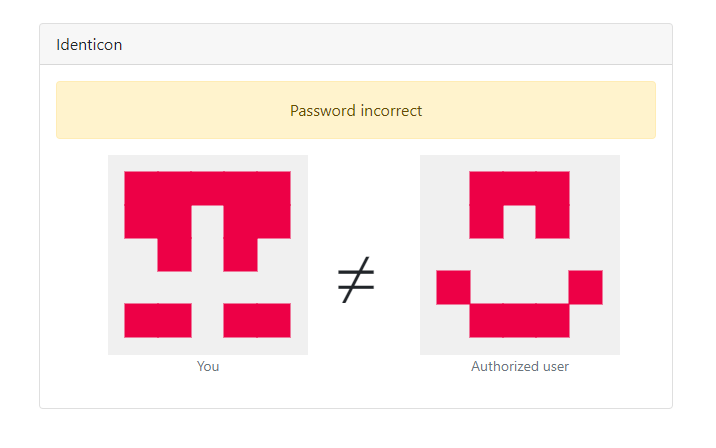
When we start the application, we are prompted with a simple password input. We need to input a password 16 or more characters long. If we submit something random we can see the password is incorrect:

On this page, we also see two identicons. From past experience, I remember something like this. An identicon like this is used in Github for example when you create an account, and these are normally generated from a random string of characters.
We also get the source code to the application in a server.js file:
const = // https://github.com/stewartlord/identicon.js
const = // http://expressjs.com/
const = ;
.;
const = process.env. ||
const = // Long base64 string
const =
const = const = 3000
;
Here we can see what's happening. If we GET the home page, we just get returned the form. If we POST the form, we get into the password check. It first generates an identicon with our password and then compares it to the valid_user variable. This was a long base64 string, so we might need to reverse it to get back the password it is generated from. Lastly, we get the flag if the password is correct.
Reversing the Algorithm
Now we should look into how the identicon gets generated because we only see an Identicon() function call. At the top, we can see the identicon.js library is used though, together with a direct Github link to the repository. In the repository, there is a package.json file which is always required for any JavaScript module. It's a good place to check first.
Here the main is defined as identicon.js. This file then contains the code that is run. When we call the new Identicon() function it runs a small piece of code that saves some options of the identicon. Including the hash, which is directly the input we give the function. This will be useful for later.
var ;
We previously found that the toString() method is called on the Identicon object, so let's take a look at that function in the identicon.js file
toString:,
Looks like it just calls the render() method and encodes it in base64. If we look at this render() method it contains the real algorithm:
render:,
This code might look daunting at first, but it's actually pretty simple. There is also a nice comment helping us out:
the first 15 characters of the hash control the pixels (even/odd)
they are drawn down the middle first, then mirrored outwards
If we look at the code we can see this as well. The first 15 characters of the hash are used to determine the color of the pixels. Based on the character value it is converted from a hexadecimal number (16) to an integer. This number determines whether the bg (background) or fg (foreground) color is used. This is done with the % 2 which means modulo 2 and is pretty much the remainder after division by 2. An even number would have a remainder of 0, and an odd number would have a remainder of 1. This makes it so the color is bg if the number is odd, and fg if the number is even.
The rest of the code just places the pixel in the right spot. Like the comment says it just draws from the middle down, and then goes outwards mirroring the icon. To make it more clear this would be the order:
|b|6|1|6|b|
|c|7|2|7|c|
|d|8|3|8|d|
|e|9|4|9|e|
|f|a|5|a|f|
Creating our own Identicon
Now that we understand the algorithm in the identicon.js library, let's look back at the challenge. The following line generates our identicon:
let = new.;
So our password from the input gets converted to a hexadecimal string, and then passed to the new Identicon() function. Finally, it renders the identicon with the toString() method.
But the identicon.js library expects a hash, not just raw hex input. These are both hexadecimal strings, but in our case, we have full control of the string, where it would normally be random with a hash.
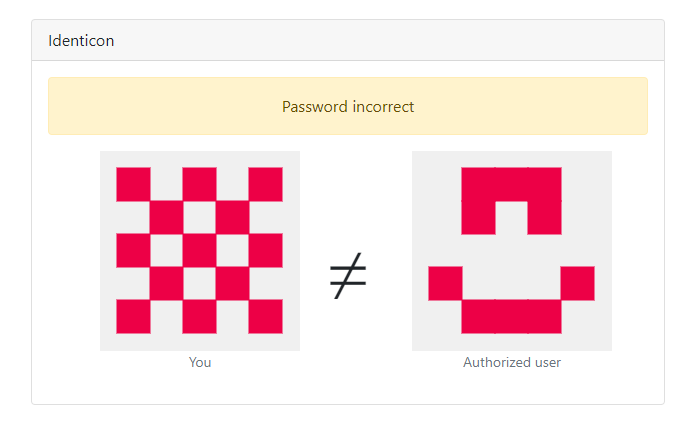
We learned from the reversing that the function just goes through all the characters of the hash one by one, and uses the % 2 to determine the color. So if we input some string like AAAAAAAAAAAAAAAA (16 a's), it gets converted to 4141414141414141.... Then for every character, it checks if it is even or odd. The 4 is even, so it uses the fg color, and the 1 is odd, so it uses the bg color. This means we should get an alternating color pattern. Testing this in the application this is indeed correct:

We can now just make our own hex string that will turn into the authorized user's identicon. We can use a 4 for an even (fg) color, and 5 for an odd (bg) color. We just need to follow the pattern in the order above, from the authorized user and make the following string:
455544455455545
This is still in hexadecimal, so we need to convert it to ASCII to input it as a password. It is also not long enough yet because only the first 15 characters are used. This means it doesn't matter what characters come after, so we can just add some random hex characters to the end to fill the space.
Converting this to hex with a CyberChef recipe we get a password like this:
EUDETUTVffffffff
The first characters are the identicon, and the f's are just to fill the space. If we now try this password in the input it should generate the correct identicon and give us the flag. And sure enough, we got through the password check and see the flag!
CTF{482c811da5d5b4bc6d497ffa98491e38}